How to Completely Uninstall IDM from Windows 10 (Easy Guide)
If you're looking for the best way to remove IDM completely from your PC, you're in the right place. Internet Download Manager (IDM) is a popular tool for speeding up downloads, but it can become unnecessary or problematic over time. Some users find it hard to uninstall due to leftover files, registry entries, or browser integration.
In this guide, we’ll show you two simple methods of how to uninstall IDM from Windows 10, step by step, and how to completely delete leftover IDM files and folders from your system. Whether you're switching to another downloader or just want a cleaner system, this guide ensures IDM is fully removed. Get unlimited IDM Serial Keys to register IDM for Free
1. Using Control Panel
You can easily uninstall IDM with the built-in Control Panel. This is the most straightforward method, ensuring that you remove the core files.
Accessing Control Panel on Windows 10
To get started, open the Control Panel:
- First, click the Start menu and type Control Panel in the search bar.
- Or press Win + R, type appwiz.cpl, and press Enter (This opens the Programs and Features window directly)
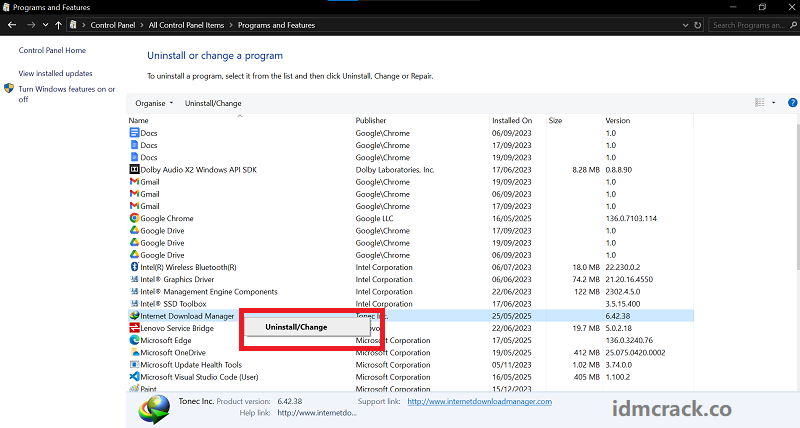
Removing IDM via Programs and Features
- Scroll down and find Internet Download Manager.
- Click on it, then select Uninstall from the top menu.
- Follow the uninstall prompts to complete the process.
- Restart your PC to apply the changes.
Delete Leftover IDM Files and Folders
Even after the standard uninstall, IDM may leave behind folders and files. Cleaning them up manually helps ensure no background processes or junk files stay on your system.
Check These Default Installation Paths
Use Windows File Explorer to navigate to these locations:
- C:\Program Files (x86)\Internet Download Manager
- C:\Users\[YourName]\AppData\Roaming\IDM
If these folders are still present, they weren’t removed during the uninstall.
How to Manually Delete Residual Files
- Open File Explorer (Win + E) and go to each of the paths listed above.
- Delete any folders named Internet Download Manager or IDM.
- Once deleted, empty the Recycle Bin to permanently remove the files.
These steps confirm that you delete IDM folders and remove leftover IDM files that may interfere with future installs or updates.
2. Remove IDM from Windows Registry
Leftover registry entries can sometimes trigger error messages or interfere with software behavior. To permanently remove IDM from your PC, it is recommended to clear the registry.
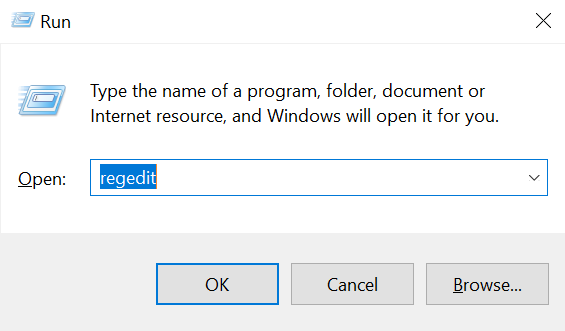
Open the Registry Editor Safely
- Press Win + R, type regedit, and hit Enter.
- Before making changes, backup your registry by going to File → Export and saving a copy.
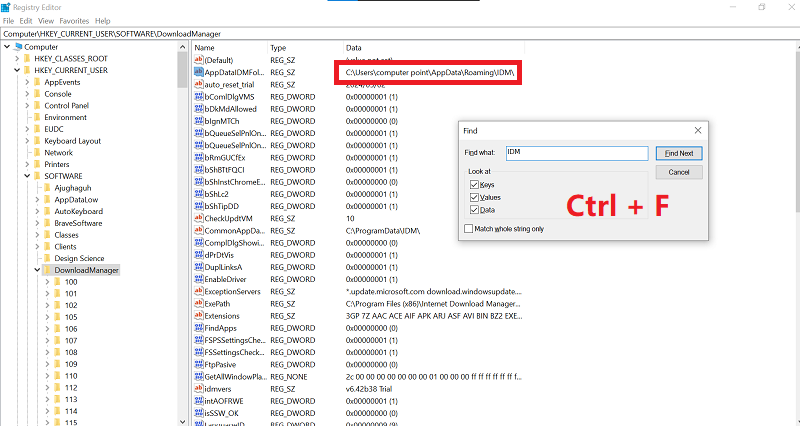
Locate and Delete IDM Registry Entries
Inside the Registry Editor:
- Press Ctrl + F and search for IDM or Internet Download Manager.
- Review each result carefully. If the entry clearly belongs to IDM, right-click and select Delete.
- Use F3 to continue searching and repeat this process until all relevant entries are removed.
This process helps you delete IDM registry entries and prevents IDM uninstall not complete errors in the future.
Conclusion:
By following the above methods, IDM should be completely removed, and there should be no traces left on your system related to IDM. This is how you can easily uninstall IDM from your PC and ensure it won’t interfere with your PC going forward.
Bookmark idmcrack.co for any type of solution regarding Internet Download Manager (IDM). If you have any queries related to IDM, please let us know in the comments section.